Renaming Files and Folders the Automator Way
One the neat things about the little talked about Apple program, Automator, is that it's the software development program for the rest of us. Let's face it, 98% of us Mac users will never ever write a line of code or much less conjure up an original script to solve some vexing Mac problem that Apple failed to address. But Apple has given us a way to create our own little Mac gems that we can taylor to our individual needs.
It would be interesting to know just how many Mac users have opened Automator, much less created an automation with it. (If you have, let us know.) Maybe this program is only used by shrewd developers who create, design and package software to do essentially the same thing that can be achieved in Automator.
Point in case: batch file renaming. Many Mac users work with several dozen or thousands of image or text files in which we need rename all at once. There several small software programs that can do the job for us. But with Automator, we can customize an automation for our own particular needs. And the added bonus is that if you never produced a Automator workflow, just successfully completing one workflow will open the door to many other possibilities.
Renaming Finder Items Using Automator
1. First you will need a set of files or folders to rename. If you don't have any for the purposes of this tutorial, just create three or four untitled folders on your desktop. Go to your desktop and use the shortcut key strokes, Shift+Command+N or go to File>New Folder. Create three or four new folders. Leave each folder as Untitled.
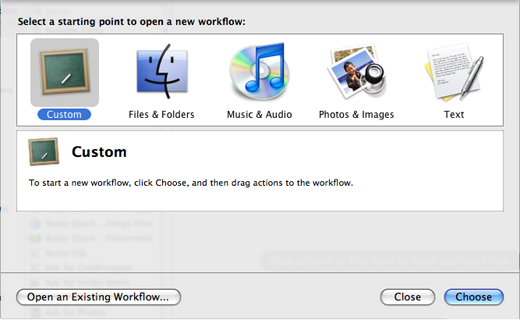
2. Now open up Automator. If you're opening up the latest version of Automator, in Leopard, a Starting Points window will appear. This window is supposed to help you get started with Automator, but I don't think it does a very good job. So click on Custom and then click OK.
3. Click on Files & Folders under Library, which will give you list of actions for that category.
4. Scroll to the action titled "Rename Finder Items" and simply drag it over to the larger workflow pane of Automator.
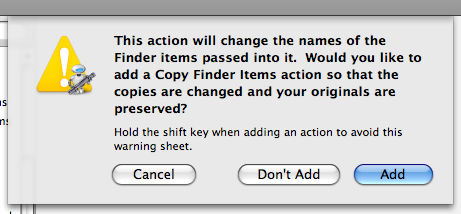
After you add the action to the workflow, you will get a warning sheet. If you plan to change real important original files or folders, you should click the Add button, but if you are just trying out this process for the first time, you can click "Don't Add." As the warning ask, when the workflow runs, it's asking if you want original files preserved with their original names or do you want them copied and renamed?
5. This step is the hardest it will get. It's like deciding what you want to eat at McDonalds. Basically you want to figure out how you want to rename your files or folders. You can set up the process so it's done the same way each time you use the workflow or you can set it up so that you can make the decision when you run the workflow. We'll do it the latter way.
Near the bottom of the action, click the box that says, "Show this action when the workflow runs."
Next, click the Run button at top right menu bar of Automator. It will run the workflow but don't worry it won't change anything. I just want you to see what the dialogue box looks like when it runs for real.
Click Cancel on the dialogue box.
6. Go to the files or folders for which you want to rename. Highlight and drag them into the workflow window of Automator. Place them right above Rename Finder Items action. Don't worry, you're not actually moving the files. Automator will simply act on them where they are.
7. For this example, we'll have the workflow copy and rename the selected files or folders. So we'll need a place to have the files copied to. Go back the list of actions in Automator and select Copy Finder Items. Drag it in the workflow window right under the Rename Finder Items action. (Note: when you actually use this action on a large number of files, you may not want to have the files copied, or at least you probably want to have the renamed files copied to a specific place and not scattered all over your desktop. To have the files copied, add the action, Copy Finder Items to your workflow.)
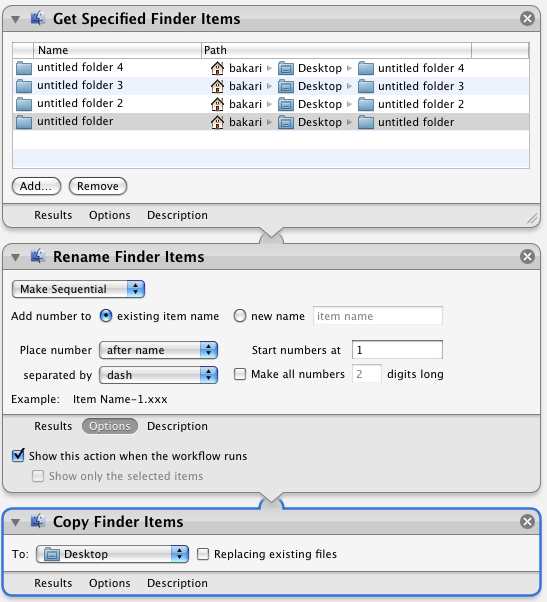
8. Now click the Run button again. When the dialogue box appears, let's change the first drop-down button to Make Sequential. Click the "new name" button and type the new name you want for your selected files or folders. In this example, we'll simply use the name, "Test." Notice at the bottom of this action that you get an example of what the renamed title will look like. You see a few other choices you can make as well. Experiment to your hearts content.

Next, do not click Continue; click Cancel instead. We'll do the actually re-naming in the next step.
9. Now you might thinking, I don't want to open up Automator each time I want to perform this process. No sweat. Automator provides several ways to run your action you need it. You can run it like any other application on your Mac; you can run it as a plug-in, or even a folder action, whereby when you drop files into a folder the action will be performed.
For our purposes, we're going to run it as a plug-in, so we can easily call it up when needed.
In Automator, go to File>Save As. When the dialogue box drops down, select Plug-in for Finder. Give your now Automator plug-in a name, something like "File Renamer." Click Save.
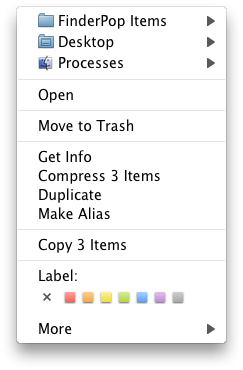
Now select your original files or folders for this tutorial. Right or Control-click on those files. When you do this, a dialogue box will appear. Move your cursor down to where it says More. Move over to where it says Automator. And it's there that you will find your "File-Renamer" plug-in/action. Click on that and watch your files or folders get renamed.
For you would-be Mac power users out there, you can find the plug-in you just saved by going to to Home Folder>Library>Workflows>Applications>Finder.
If you play around with Automator enough, you will discover at an half a dozen or more custom actions that you can build to help you perform redundant tasks like these. You can find additional examples of Automator workflows on Apple's site (http://www.apple.com/downloads/macosx/automator/), http://www.Automator.com (http://automatorworld.com/) and in Ben Waldie's book, Automator for Mac OS X 10.5 Leopard.
 del.icio.us
 Digg
Digg Facebook
 Slashdot
 StumbleUpon

Comments
I have actually created an Automator script to fill in a stupidly missing function in OS X. I used it to be able to “move” files from one drive to another without having to copy and then delete the file.
If I understand you correctly, you really don’t need a script for moving a file(s) from one drive to another. Just select the file and hold down the Command as you drag it to the other drive. That will move the file instead of copying it.
Thanks, Bakari. I had actually forgotten about that. Am I wrong in thinking that you couldn’t do this in previous versions of OS X?
Hmmm, not sure if it was possible in Tiger. It’s been a while since used it.
Automator can create multiple types of workflows; it includes built-in templates for the most common workflows. In this guide, we’ll use the most basic template: the Workflow template. -Tire Works