Resize Images with Easy Batch Photo
You’ve all been in this situation before. You get back from your holiday or family wedding with a large selection of photos, but know that the 3264 x 2448 resolution is going to be physically too large to fit nicely on your best friend’s crappy 15” CRT PC monitor, and e-mailing them has suddenly become a cause for concern with regards to your bandwidth limitations—1MB for one photo is just far too much!
While the latest and greatest digital cameras come with a variety of sexy features, they also come with much better specifications, which means you can take incredibly beautiful, high quality photos that can be blown up at a later stage to the size of your farmhouse and still look great.
Okay, I’m exaggerating a little but you catch my drift. So what do you do when you need to resize a photo? Open it up in ImageWell or Adobe Photoshop? Sure, you could do that, but try resizing 50 photos! A nightmare, believe me.
iPhoto does have a little trick built-in whereby when you’ve selected the photos you wish to resize, you simply head to File > Export and then adjust the image size in the File Export window, but the customization options are a little lacking, which is where EasyBatchPhoto comes into play.
What is EasyBatchPhoto?
Created by the guys at YellowMug, EasyBatchPhoto allows novice to the most advanced users to convert, resize, and watermark (if required) a batch of photos (or images) with ease. See what I did there? The idea is simple, the task is easy, and the speed is pretty darn good too.
Will it appeal to me?
If you’ve just come back from holiday with 100+ photos that are too big in file size to send to your mother over MSN or even CD/DVD, then yes, EasyBatchPhoto will appeal to you. Even if you’re a pro who needs to resize a bunch of images or perhaps a webmaster who needs to add a copyright watermark to your photos, then EasyBatchPhoto is also for you. A great time saver, believe me!
How does it work?
Using the image below as a guide, you first select the destination folder where you wish your newly converted or resized images to be placed. From the same area you can also change the output filename of your files, so if your photo names end in something like DSC_198504.jpg, you can change it to something like 2007_holidayphoto_#.jpg just to make it that little bit more memorable.
The next stage is to customize your converted images. A nice little feature is the “Preset” section where you can add a variety of presets, each with their own settings. As you can see in the screenshot below I’ve created a “Web” preset, so anytime I select this it will automatically set the photos to the preset settings.
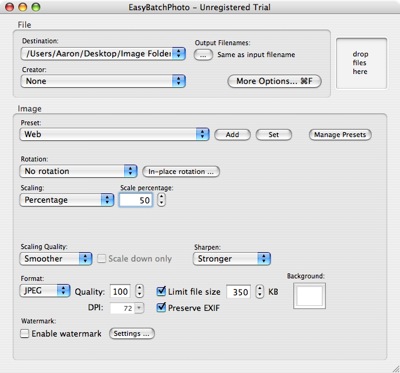
Main EasyBatchPhoto window
Below this is the rotation and scaling area. There may be times when you’ve taken a photo on its side, usually to gather a larger image area of perhaps a group of people standing close together, and rotating a group of photos can be a real pain, so this feature is welcome. Scaling an image down is also a must if your photos have an absolutely huge resolution that would serve no real purpose on a pathetic little 14” PC CRT monitor your mother is still using (And why is she still using that? Buy her another one). Images can be scaled down in a variety of ways, including Percentage, Stretch-to-Fit, Fixed Width, Fixed Height, Crop-to-Fit, and Fill-to-Fit, to name a few.
The next option down is scaling quality which I can only assume is a time saving feature. Obviously the higher quality your photos are, the longer they will take to convert, so reducing their scaling quality from “Smoother” (best) to “Jagged” (not so great) will greatly reduce conversion times if you’re in a rush or simply impatient.
Below this once more are the format settings, including file size, resolution, and overall quality of the photos/images you convert. The only formats available are JPEG, PNG, and TIFF—I don’t know if there’s a reason for lack of options, such as the three mentioned offering better quality than some of the other file types out there (e.g. GIF or BitMap). I certainly don’t claim to be an image expert. The other major option available here is the File Size limitation, where you can determine the maximum file size an image can be converted to, which is great if you wish to keep an e-mail under 5MB or put all your photos on a CD.
The last notable feature is Watermark settings. For the pros or webmasters out there this is a whole different section in itself. You can choose to have an image overlay as a watermark, which is the only way to really get your company name and copyright featured on the image as there is no text field to enter your own information, or you can choose to have your photos EXIF information appear. For those who aren’t aware, EXIF is the information taken from your camera and fine printed onto your photos, and the details here include camera model used, image size, image dimensions, exposure time, flash used, focal length, ISO, and date created, to name a few.
Summary & Testing
To give you an idea of how long it takes to convert, I picked 10 photos, each with a resolution of 2560 x 1600 and a file size of between 500kb to 1.5MB, and converted them to 50% of the size with a file size limit of 300KB while trying to keep the quality as high as possible. All of this was done on an iMac running a 2Ghz G5 processor and 1GB of RAM. Total time? 15 seconds, which I think you’ll agree isn’t too bad at all. There was a loss of quality in some of the photos, but considering they’ve been squashed into 300KB each I don’t think it’s right to be too harsh.
You can download a demo of EasyBatchPhoto from YellowMug’s website which features a rather annoying watermark on all the images, but cost of the software is fairly reasonable if you value this sort of thing, at just $23.95.
Website: http://www.yellowmug.com
Demo: http://www.yellowmug.com/easybatchphoto (1.4MB)
Latest Release: Version 2.1.3
Requirements: OS X 10.3.9 or later, some features require OS X 10
Rating: 8/10
 del.icio.us
 Digg
Digg Facebook
 Slashdot
 StumbleUpon

Comments
For that price, I have opted for the unlimited pro version of Flickr ($24). The free Flickr uploader (which is newly Universal binary) resizes pics and uploads them to any album I choose or lets me create a new one, and Flickr itself allows me to store unlimited numbers of photos in unlimited numbers of albums for sharing, labeling, and organizing.
It’s not exactly the same thing, but it’s a nice alternative to e-mailing attachments or burning them to a CD/DVD for snail mailing them.
Doesn’t seem to do much more than the FREE Resize! 1.4.2:
http://www.macupdate.com/info.php/id/16845/resize!
sips -Z 1024 -s formatOptions best -o ~/Desktop/ /path/file
I need similar software for my AVI video clips I capture using my canon Digital Camera. Any software recommandation?
I have a similar software (iMagefit for mac), i can import photos from camera directly, that’s very convenient.
you can try!
http://www.imediacreator.com/mac-image-fit.html#175