Review: SuperDuper! v2.1 Backup Utility
Last week I reviewed Apple’s Backup 3 that uses a traditional approach to backup, backing up selected files and building up a library of backups from which to restore.
SuperDuper! on the other hand, creates a single backup, in a sense, a snapshot. You can still select files but when it backs up, it modifies the backup image to contain any new or changed files.
Another difference between SuperDuper! and traditional forms of backup is SuperDuper! uses an “Exclude” model, as opposed to an “Include” model. This mean you have to tell SuperDuper! what files not to backup, i.e. exclude. The “Include” model takes the opposite approach in that it won’t back up anything you don’t tell it to, i.e. include.
SuperDuper! can also be used for making a clone of your system, which is obviously very useful in the event of hard disk failure. Ideally this requires (on the initial cloning) a hard drive that you can totally overwrite. For the purpose of this review, I will focus on SuperDuper! as a tool for backing up your data because SuperDuper! was recommended to me as an alternative to Apple’s Backup 3. Although backups are not SuperDuper!’s primary purpose (even the SuperDuper! website blurb focuses on system recovery, not data recovery), many people are using it this way.
Backing up with SuperDuper!
In SuperDuper!’s main dialog, you select a source and destination. The destination can be a drive, iDisk or a disk image. For backup purposes, a drive image is sufficient and this can be stored on any drive with sufficient space. Although SuperDuper! does notsupport writing directly to CD/DVD, a disk image, if small enough, could be created and then archived to CD/DVD using another application. For myself, I have set up two backups to drive images on my iPod.
SuperDuper! uses scripts to perform backups. Don’t let that scare you, as it’s not like a programming language. A SuperDuper! script is simply a list of exclusions. It comes with two default scripts for backing up - one for all files and one for just your Mac’s user files. You can also create your own custom scripts. You can also tell SuperDuper! to include existing scripts which means you don’t have to recreate common file exclusions (eg caches or temporary files) for each new script.
For a lot of users, the pre-defined script “Backup - user files” will be sufficient. But I found many files I wanted to exclude, such as the copies of other backups I still had floating around my desktop. This involved creating my own custom script, which presented an interface unlike any I’ve seen before in a standard OS X application.
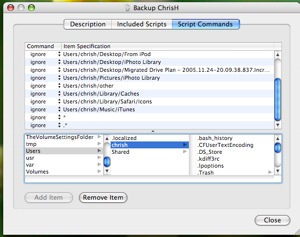
On discussing this with the developer, I found redevelopment of this interface to one using more common OS X interface elements, is a priority.
Once you’ve selected a source, destination and script, you can look at the Options dialog. In the options you can tell SuperDuper! to repair permissions on the source, what to do on completion and how you want subsequent backups to be processed. For this there are four options:
- Erase destination before backing up
- Perfect clone of source (called “Smart Update”)
- Copy newer files. This copies files where the modification date is newer
- Copy changed files. This copies files where any information - such as modification date, size, permissions etc - has changed.
The key difference between the second option and the last two is, if a file has been deleted on the source, it will only be deleted on the destination by the second method (and of course the first) as it is maintaining an exact replica of the files you want backed up. This also means backups using the second and third method, will grow bigger than those using the first two methods.
There are also Advanced options which really are advanced, so I will leave them alone, as will most users.
My first backup of 15GB took about two hours. Subsequent backups using option three are taking less than 10 minutes. I would expect similar times for methods two and four; whereas method one will always take a very long time, so when used, should be scheduled during idle times.
The trial version of SuperDuper! only allows the “erase destination” method.
Because SuperDuper! overwrites files in your backup, you should not depend on it for historical tracking of files unless you employ a proper backup regime. Eg, lets say you want to restore your budget spreadsheet but as it stood six months ago. With an incremental backup system, you could just find the corresponding backup and restore the file from it. But Incremental backups should never be relied on long term. With good backup practices, no matter what application you use, a full backup should be preformed at least monthly (although that is dependent on how much and often your data changes) otherwise you can end up with a mountain of incremental backups, and in the case of some applications, if one fails, the whole set can’t be used. The drawback of regular full backups is you will need more media space.
Scheduling backups
Scheduling backups in SuperDuper! is easy and flexible. The user can specify the exact days of the week, or weeks of the month to run a backup, which is useful for alternating backups sets such as Mon-Wed-Fri and Sun-Tue-Thu-Sat. Like Backup 3, SuperDuper! lacks an end-of-month backup option.
Restoring with SuperDuper!
To quote SuperDuper!’s user guide:
Recovering a single file – or a few files – is quite easy. Just attach the external drive or mount the backup image, and drag the file back to the proper location using the Finder.
That’s all there is to it!
This is very simple, but I’d still like to see SuperDuper! provide an interface for restoring.
Like Backup 3 last week, SuperDuper! does not provide an option to verify disk image backups, although it’s easy to do manually , simply double-click the image, and if it opens, it is usable.
Overall
Plasticfuture provided a comparison of the several backup applications and found that SuperDuper! was the only one that backed up and restored all file metadata, such as dates, ACLs, permissions. (Unfortunately they did not test Apple’s Backup 3.) Consequently, SuperDuper! was the only backup application they recommended unequivocally.
Home users’ backups are becoming very large so backing up to removable media as we did in the past, such as floppies, Zip disks, CDs and DVDs is becoming impractical. Therefore backups are requiring either tape drives or more convenitently, external hard drives. My home folder for example is 15GB and I only have 1000 songs and 2500 photos. Fortunately I don’t have any iMovies.
To create a proper backup regime requires more than one destination media, such as a couple or more external hard drives. If you backup is small, you could still backup to CD or DVD but these can be very slow - although on the plus side they are easy to file and catalog - and as mentioned, SuperDuper doesn’t write directly to them.
Although external hard drives are reasonably cheap, for backups, you should have two as a bare minimum, which for a couple of 250GB drives, would set you back a fair chunk of what you could pay for a Mac mini. If you are archiving a 10GB backup each month, that’s about two years on a 250GB drive, which of course, would be the case no matter what backup application you are using.
SuperDuper! is a great product, and with a bit of manual intervention, can be used in a successful backup regime. For example, by backing up my most important data to DVDs each month I will maintain an historical record of those files. As said earlier, I can do this by creating the disk image and then burning it to DVD.
Overall, I’m marking SuperDuper! down a little on usability issues such as it’s non-OS-X-like file selection process, and not providing a restore process through the application itself; however I’d highly recommend you consider SuperDuper! for your backup regime. 8/10
 del.icio.us
 Digg
Digg Facebook
 Slashdot
 StumbleUpon

Comments
I’ve completely stopped using Retrospect Express and switched to SuperDuper!, and heartily recommend it to my Mac friends. It’s simple to use, utterly reliable, its backups are fully bootable in a catastrophe, and scheduling backups to partitions on a backup drive are a simple point and click.
The only weakness is version control, as you point out in your article, but that’s not an issue for me. I save critical updates for individual files to my .Mac server account and let Apple worry about backing them up.
Hi Chris. One point to clarify is the mention of “hard drive” in several places where “volume” would be more accurate, such as:
Ideally this requires (on the initial cloning) a hard drive that you can totally overwrite.
SD! uses volumes (and image files) as the source/destination, not an entire drive unless it contains a single volume.
Definitely agree about the exclude/include/ignore file picker usability. Creating anything but simple custom settings for copy scripts quickly becomes too complicated and error-prone. In addition to improving that UI, I’d like a way to verify the “intended correctness” of settings/scripts with some kind of dry-run simulation of operation that doesn’t actually copy any data.
Thanks, SJK. Good point. That oversight was partly because I wanted to use terms that anyone would be familiar with, but also I was doing my final proofread (where I’d pick up those little oversights) an old PC whose screen was very blurry.
I like your other point too, that’s one thing I missed - SD! doesn’t estimate required space.
Thanks too for the tip-off to give SD! a better look. Although it will require some manual intervention, I reckon I’ll probably end up using it as my main backup program.