Software Review: AKVIS Noise Buster
AKVIS Noise Buster
Price - $49
Pros - Easy to learn and use. Fairly powerful.
Cons - Price. System requirements.
Score - 8/10 (recommended)
[Product Note] Noise Buster supports Adobe Elements, Adobe Photoshop and GraphicConverter X for Mac. More applications are supported under windows and complete list can be found here: AKVIS
AKVIS is the maker of six different image enhancement plugins for use with programs such as Adobe Elements or Adobe Photoshop. Today I am only reviewing their Noise Buster plugin, but information about the rest of their software lineup can be found at their site.
Noise Buster is a plugin that removes noise (as the name would suggest) from digital images. But it also can smooth and sharpen your image so that the best possible picture is produced.
Installation
Assuming you are using OS X, this is as easy as dragging the plugin to the appropriate folder. Since I am using Photoshop the Noise Buster Plugin (for me) would go here: [computer name] -> [harddrive name] -> Applications -> Adobe Photoshop CS2 -> Plug-Ins
You can just leave Noise Buster in the Plug-Ins folder or you can place it in a specific folder of your choosing. Regardless of where you put it, so long as it is located in the Plug-Ins folder it will work.
Enhancing Photos
For this product to work well you will need a picture with lots of noise in it, otherwise you won’t be able to notice much of a difference using the automatic settings. A photo taken from a digital camera will work nicely, however, the most impressive results can be seen by enhancing older 35mm photos. So dig out your photo albums and start scanning in your old prints. It would help, by the way, if you used a decent quality scanner.
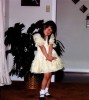
So, once you have your picture in a digital format, open it in your image editor of choice (I am using Photoshop). Here is the picture I used, it is of my wife when she was about 5 years old. Isn’t she just the cutest thing?

When you are ready to use Noise Buster go up to the menu, click on Filter and search until you find Noise Buster. This will bring up a new window that contains your image on the left and Noise Buster’s controls on the right. You are now ready to clean up that noise!
First, move the cursor over a section of your picture that needs the most work. Once there click and drag, as you do this a small box will appear that highlights your selection. The box can only be drawn to a certain size so don’t worry if you can’t get everything you want within its confines.
The box you just created will preview all of the changes you will make. So, if you increase the sharpness, reduce the noise or tweak any other settings all of the changes will appear inside the box you just drew while the remainder of the picture is left untouched. This allows you to work more quickly because less things need to be rendered. Unfortunately, every time you change a setting, your preview box is updated. So, if you want to change four different settings then you will have to sit through four different renders. If you are running a older machine that doesn’t have a lot of power behind it then this can take a little while.
At some point, once you have optimized all of your settings, you will be ready to apply them to the entire photo. To do this you simply click on the green play button at the top of the screen. This applies your changes to the whole picture. If you are satisfied then you can click the green check mark to permanently apply them to the image and exit Noise Blaster. Also, pressing the red button will close Noise Blaster without changing your picture.
Notes on usage
You will have to zoom in to at least 200% to fully appreciate some of the changes that might take place. Changing some settings produces little to no discernible effect, this is largely due to the type of photo you are trying to enhance. Also, using the Automatic Filtering button will produce the cleanest realistic photo, but not necessarily the best one. See what I mean with these examples:
This is my original picture:
This is the picture using the automatic filtering button:
And this is the picture using my custom settings:

See how the third one looks the best? Now, it isn’t the most realistic, but it does look really nice. This can be useful for sprucing up your picture for an online dating service.
To better compare how well Noise Blaster works here are two close up shots that compare my original photo to the automatically filtered photo.
Image 1:

Image 2:

Notice how much better the second images look? Those took just two clicks of the mouse and about 10 seconds each on my PowerMac G5. It is that easy. Of course, for those willing to spend a bit more time some very cool effects can be produced. Such as this glowing, angel look I managed to create:

Conclusion
From a results perspective Noise Blaster certainly delivers. It is simple to use, fairly powerful feature-wise and it produces very nice results. However, it might take a little while to get those results on a machine that doesn’t have two 2.5GHz processors with 2.5 GB of RAM. So if you are using this on a laptop you will probably have to wait a bit longer than I did. However, that isn’t really so much of a problem as an inconvenience. The only other complaint I have is with the price. Noise Blaster will run you $49. Now, I realize that doesn’t seem like much to a serious user, but an amateur photographer who only spent $89 for Adobe Elements might balk at dropping $49 for a plug-in. In the end it comes down to this. If you are going to invest in several hundred dollars in a digital camera, image editing software and a photo quality printer, then another 50 bucks for this plug-in shouldn’t even be an issue. However if the extent of your image editing prowess is clicking the Enhance button in iPhoto then Noise Blaster is probably overkill for you. Otherwise this is a solid piece of software that I will soon be buying myself.
 del.icio.us
 Digg
Digg Facebook
 Slashdot
 StumbleUpon

Comments
If your wife sees this she’s going to kill you . . .